
The last weekend in April has arrived, it’s time to open those curtains, clean the windows and let the sun pour in. Of course, if you really want to bring your indoor living space to life, you’ll hang a crystal in those windows that welcome the sun.
Why Hang Crystals?
It doesn’t matter if you hang one or a dozen crystals, they are going to bring an array of intoxicating color into your home. Beams of light that dance around your room not only make the space appear larger, they breath new energy into the environment.
Placement
When you hang crystals in your window, they need to be close enough to the glass to capture the sun’s rays yet not so close that they can’t twirl around. It’s easiest if you hang a tension rod for this purpose, then you can hang one in the middle, scatter several across the width of the window at various heights or create a cluster.
For an even more dramatic look, position them so their light beams will reflect off a mirror or stainless steel object so your entire room will fill with a rainbow of color. You may want to experiment with several different sizes and shapes because every crystal will create its own unique pattern. Be warned though, staring at dancing rainbows can be additive!

Towel warmers sure have found their place in contemporary homes. The traditional image you may picture when you think of a towel warmer has gone through a huge transformation and today they are available in an endless number of styles, some rather exquisite like a piece of art.
The Boz Guitar Towel Warmer by Wesaunard makes it more than clear that you can have a functional piece of art in your bathroom! Made in a two-toned gold and chrome finish, Wesaunard says that their designers created this piece, inspired by objects of affection being women, wine and great music with the goal of bringing zest and luster into any bathroom.
How they Work
Maybe you’re under the assumption that towel warmers are only for spas but this is not the case, you can have one in your bathroom too. Once you have one, you won’t believe you managed to shower your whole life without it! There are basically two types of warmers being electric and hydronic.
- Electric – These have a filament inside as well as oil, you plug them into an outlet and as the temperature of the oil rises, the racks get warm and so do the towels. They use low power, are energy-efficient and completely safe, some even have an automatic shutoff feature.
- Hydronic – Hot water is used to heat the rails in these types of towel warmers. They connect to the hot water system in your home and then a pump pushes hot water through the rails to heat the towels.
Towel warmers are one of those luxuries that everyone deserves but few think about actually purchasing. Don’t you need a functional piece of art in your bathroom? Visit the Wesaunard website for more information on their contemporary collection.

The weekend has arrived and it’s spring which means it’s time to get out in your yard, breathe in some fresh air, soak up the sun and clean away the mess winter has graciously left behind. This is also the time to think about shopping for a birdbath because once April showers are gone, your feathered friends won’t have so many puddles to bathe in. Not to mention, birds of any type compliment and bring your outdoor space to life!
Birdbaths come in a vast array of styles and can be a dynamic addition to your outdoor decor. However, when not cared for properly, they look unappealing and can harm the birds. A little basic maintenance will go a long way!
- Scrub Scrub Scrub – At least once a week you should empty the water and give the birdbath a good scrubbing to get rid of algae and left behind residue. Of course, you need to add fresh water daily but you only really need to scrub it weekly. Old water is a breeding ground for bacteria and mosquitoes and it can make the birds sick.
- Lavender – Did you know that if you place a few fresh lavender stalks in the water it prevents unwanted bacteria buildup and won’t harm the birds? Lavender has natural antibacterial properties!
Placement
When deciding where to place your birdbath, it should be near a low tree branch, overhang of something high enough where predators can’t get to it yet low enough to require little effort to fly there. Birds are not the fastest and most efficient fliers when their feathers are soaked so if their bath is disturbed, they need a place nearby to escape to safety.

Stripes painted on a wall can make quite a dramatic impact on an entire space. They can be subtle with two very close colors or bold with a full palette of vibrant shades and they are ideal for any room in the house. Stripes look outstanding horizontal or vertical, on an entire wall or on the bottom half with a border to break up the area. That being said, as remarkable as they can look, they must be done properly, with a lot of care. There is truly nothing at all appealing about a crooked, uneven or smudged stripe.
- Measure the Wall – Measure the entire wall and then determine how many stripes you want to create as well as how wide they will be. Keep in mind, they do not all have to be the same width but there should be some sort of pattern.
- Mark Lines – Beginning at one corner, mark where the first line will go at both the ceiling and the floor. Continue to do this across the entire wall.
- Tape – Use painter’s tape to run the roll from the ceiling down to the floor on either side of the stripe, making sure it lines up perfectly to the marks you created.
- Paint – The roller you use to paint should be scaled to the size of the stripes you’re creating, generally a small one will work best. You can paint right over the tape so don’t worry about staying in the lines.
- Remove Tape – While the paint is still slightly wet, remove the tape very careful and leave the wall to dry.
Stripes are a nice change for a room that you just can’t decide what to do with. They are also an easy way to bring a little color into a dull space. Vertical lines can help if you have low ceilings to make the room appear taller while horizontal lines can offer the illusion of a larger area.

What ever happen to good old-fashioned picnic tables? For quite a while, they could be seen in every yard, park, etc., but now it seems as though people make more contemporary style choices with their outdoor furniture and have no need for these traditional pieces. Still, can anything really beat the memories a group can make gathered around a picnic table?
Well, The Hopper table pictured above certainly changes ones opinion about picnic tables! This sleek picnic table by Extremis was thoughtfully designed Dirk Wynants who was inspired by communal celebrations. Hoppers, farmers and long days working out in the field often ended with everyone gathering around a long table swapping stories, sharing laughs and indulging in some great homemade food.
The Hopper’s benches and tabletop are made from natural Iroko wood while the frame and bolts are powder-coated steel. The integrated sunshade is more than appreciated for areas that receive direct sun all day but of course, this can be closed if you prefer or eliminated altogether!
To find out more information on the unique Extremis creations or to locate a dealer, you can visit their website. Sometimes early inventions just need a little attention to spin them into something new and dynamic.

Do you have an old nightstand you just don’t know what to do with or maybe you stumbled across one at an antique store, flea market or garage sale? Before you turn your nose up at that chipped paint, think about giving it a second chance. There are some truly unique and spectacular stenciling methods you can employ on this type of furniture.
- Prep – Remove any handles and sand where it is needed. Apply an even but thick coat of a quality all-purpose sealer using a foam brush and allow this to dry completely.
- Paint – Everything should be painted a base color before you begin stenciling any designs.
- Stencil – You can buy stencils at a craft store or make your own. The most important rule to stenciling is to allow one color to dry completely before laying the stencil over what you have just painted so you don’t smear your work. This may take a little patience but even if the paint is a little tacky, it will affect the result if you try to lay a stencil over it.
- Finish – To make sure that your hard work is well protected, seal the piece with a few coats of varnish, preferably satin finish. Fasten back on any handles that you previously removed.
Stencils can be used to create any kind of look, blend with a theme or add a focal point. This method is great on any type of furniture and ideal for kids rooms and nurseries.

Did you know that there are exquisite paintings that are available on an outdoor canvas? Surprisingly, many people don’t! If your deck or patio is at the back of your home like most are, you have a wall that grants you the perfect opportunity to hang a piece of art.
While you can find original pieces of art, you can also buy those like the Moss and Falls piece that is pictured, that are captured with high definition photography. They are then digitally reproduced, printed on a canvas and then wrapped on an all-weather stretcher bar. These gorgeous pictures are coated with an ultra violet lacquer which prevents the colors from fading, leaving it completely waterproof. Outdoor canvases are designed to stand up against harsh environmental elements and can be washed off as needed.
Why shouldn’t you have just as nice art in your outdoor living space as you do inside? Now is the time of year when everyone is happy to get outside and enjoy the sun so add pieces to the area that compliment the experience. You may be surprised just how little time you spend indoors when your deck or patio is as beautiful as your living room!
The Moss and Falls canvas shown along with a full collection of gorgeous pieces including landscape, abstract, animals and birds, botanical and floral, European, coastal and tropical, sailing and nautical and more can be found at Outdoor Wall Direct.

If you are planning to add a deck to your backyard landscaping, you have quite a few decisions to make, one of those decisions is choosing between wood or composite decking. While either will look spectacular, they both have their clear advantages and disadvantages.
Wood Decks
If price is your main concern, wood is the smart choice. Although you can use several types of wood, pine or fir are the least expensive. Treated lumber is durable and should always be used for structural areas such as floor joists and posts. On the other hand, if you don’t mind spending a little more, cedar and redwood are both gorgeous and they contain natural preservatives, making them more durable. However, that doesn’t mean that they won’t still need a good stain or sealer to keep them attractive.
Composite Decking
These types of decks have become a very popular choice. Although they traditionally cost significantly more than wood, they are extremely low maintenance and very durable. Composite decking is created to look like many different types of wood. Newer decks are often created with hidden fasteners so there are no unsightly screws in any of the boards which is always a bonus as well.
If you are having a hard time deciding on material, most lumber yards will help you out or you can ask the opinion of a professional. An attractive, durable deck will give you a place to enjoy the outdoors for many years and will add to the value of your home.

Before you toss that old wicker in the trash or pass up that table set selling for a few dollars at a garage sale based on appearance, you should know that it can look dynamic with minimal effort. Wicker has a long life, sometimes it just needs a little help to be aesthetically-pleasing after a few years.
- Secure Weak Pieces – If there are any pieces that are weak, secure them using fiberglass packing tape. Then, apply glue over the nail joints and hold splintering pieces together with tightly wrapped fine stainless steel wire.
- Fix Unraveled Pieces – Brush diluted exterior glue over these pieces to soften them and hold them in place with tape until they dry.
- Prep – Using an old banister brush, clean away dirt, flaking varnish and old paint. Some parts may even need a bit of attention with fine-grit sandpaper.
- Paint – Use a self-priming acrylic to paint the wicker. If the piece is super old and extra dry, use two coats. This will give the wicker more stability and strength.
You can find old wicker anywhere that can be made to look brilliant with a little effort. Whether you use it indoors or outdoors, these are classic pieces that will never go out of style! They’re not only perfect for your deck or patio area, they’re ideal for entryways, a child’s room, reading room, basement or anywhere else you want to add a little color.

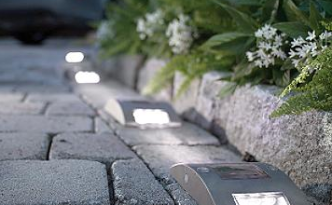
There are actually a few very good reasons to install solar lights along the edges of your driveway. First, they bring your landscaping to life at night and they are nice accent pieces during the day. Second, they help guide people into your driveway in the dark. Surely you have pulled into a foreign driveway before whether you were visiting or just turning around and found yourself struggling to see, especially in the rain. Of course, you can pull into your driveway blindfolded but lights will help others find their way and keep them off your grass.
Another reason for solar lights is they deter theft and vandalism. Whether you’re home or not, people will ill intentions are less likely to target a property that is well lit up. So, how do you decide which ones to buy?
Picking the Right One
Buying the value pack of six in a box is not always a good idea. After all, you want them to last. Choose those that compliment your home and your landscaping. They don’t have to be extravagant but they shouldn’t take away from your home either.
Installation
Whatever you do, don’t make the mistake of eye-balling it when you install your solar lights. Take the time to measure the driveway, divide by how many lights you have and then space them appropriately, measuring every time. You’ll be much more pleased with the outcome this way!

Well, it is April and depending on where you live, it seems as though you have about a 50/50 chance of either grabbing your sunglasses or your umbrella as you’re walking out the door. Where is your umbrella anyway? Buried in the hall closet? Under the bed or in the dog’s toy box? Wouldn’t it be nice to find the thing when you desperately need it and you’re late leaving the house?
Now, what do you do with your soaking wet umbrella when you come home? Lay it on your wood floor or set it on the table? You may not but there is a good chance that if you have kids, they probably do! Really, what else are they suppose to do with them?
An umbrella stand set politely at the door welcomes springtime, helps you find what you need and get out the door faster and gives everyone a universal place to put their umbrella when they come home. If umbrellas have a home, they’re more likely to make it there when not in use.
Umbrella stands don’t have to be boring though! Take for example, the cubed umbrella holder shown in the picture. It’s modern, attractive and stainless steel so you don’t have to worry about rusting and it certainly is one of those pieces that will catch the eye of anyone who comes in the door. They’ll probably even leave wondering why they don’t have one and how you ever came up with the idea that you needed one. Umbrella stands have been around a long time but they’ve never looked quite like this. You can find this cubed holder at CHIASSO online.

Whether you live in a studio apartment and want to separate your bedroom from your living space or if you reside in a dorm or share a room with someone and you just need more privacy, this can be done quiet easily by hanging fabric. All you need is fabric that will compliment your room or long curtains, curtain rods, drywall anchors, drill, screwdriver, a pencil and a measuring tape.
If you’re using curtains, you’re ready to go, otherwise, you’ll need to sew a loop on the top to feed the curtain rod through and hem the bottom. To determine how long to make your divider, measure from the floor up to how high you want it to go and add five inches. This gives you one inch to hem and four inches to create the loop.
Hang the Curtain Rod
You are going to hang your bracket from the ceiling so use your measuring tape and mark with your pencil where the brackets will need to go. Drill pilot holes first so that you’ll have an easier time installing the screws. Position the brackets over the holes and screw them into place.
Feed the Fabric
Feed curtains or fabric onto your curtain rod and place the rod in the brackets. Step back and make sure everything’s even and if so, you’re done!
Even if you don’t need to divide a room, sometimes hanging a dramatic pieces of fabric, even in a corner, can give a room a focal point it may be missing like an eye-catching piece of art.